Abstract
Purpose: The objective of this study is to analyze the cone-beam computed tomography (CBCT) scanned images for preoperative assessment of implantations in edentulous maxillary posterior alveolar ridge and to identify the relationships of performed surgical procedures.
Materials and Methods: The patients are respectively selected among those examined by CBCT in Seoul National University Dental Hospital between October 2012 and August 2013. A total of 117 patients are being included in this study: 67 males and 50 females. The average age of males is 50.4±10 and of females, 53.1±12.3. The specific cross sectional view that displays the center of planned implantation is selected as a section of interest (SOI). For each SOI, the height is being measured parallel to the long axis of the alveolar ridge from the alveolar crest to the sinus floor. The width is being measured perpendicular to the long axis for every 1 mm-interval of the axis. We have also surveyed the correlation between surgical techniques that are used in implantation fixtures and the dimension of edentulous ridges.
Results: The average height of the first premolar, the second premolar, the first molar, and the second molar areas are 12.58, 9.63, 5.79, and 5.92 mm, and the heights of those which did not reach 10 mm are 37.5%, 64.0%, 81.2%, and 88.8% at each area, respectively.
The average width of the area that was 3-mm above the crest in the first premolar, the second premolar, the first molar, and the second molar areas are 7.48, 8.13, 10.19, and 11.50 mm, and the widths of those which did not exceed 6 mm are 25% 19%, 2%, and 1% at each area, respectively. Additionally, 83.3% of maxillary molar areas require bone augmentation procedures due to height deficiencies in the performed surgical procedures.
Conclusion: From this study, we have identified that 84.8% of cases require bone augmentation procedures for implantations in maxillary molar areas. It is also suggested that it is essential to assess the preoperative state thoroughly based on the three-dimensional diagnostic images such as CBCT. Additionally, we confirm that simultaneous implantations are actively performed in the case of low alveolar bone heights where delayed implantations have been recommended.
Key Words: alveolar ridge dimension, cone-beam computed tomography, maxillary posterior area, sinus floor elevation
상악 구치부 무치악 치조제 부위의 고경과 폭경
김하영, 구 영
서울대학교 치의학대학원 치주과학교실
Height and Width of Edentulous Maxillary Posterior Alveolar Ridge
Hayoung Kim, Young Ku
Department of Periodontology, School of Dentistry, Seoul National University, Seoul, Korea
Reprint requests: Young Ku
Department of Periodontology, School of Dentistry, Seoul National University, 101, Daehak-ro, Jongno-gu, Seoul 110-749, Korea
Tel: 82-2-2072-3182, Fax: 82-2-744-0051 E-mail: guy@snu.ac.kr
Received for publication: November 22, 2013 Accepted for publication: November 25, 2013
교신저자: 구 영
(110-749) 서울시 종로구 대학로 101 서울대학교 치의학대학원 치주과학교실 Tel: 82-2-2072-3182, Fax: 82-2-744-0051 E-mail: guy@snu.ac.kr
원고접수일: 2013년 11월 22일 게재확정일: 2013년 11월 25일
Copyright © 2013. The Korean Academy of Oral & Maxillofacial Implantology
This is an Open Access article distributed under the terms of the Creative Commons Attribution Non-Commercial License (http://creativecommons.org/licenses/by-nc/3.0/) which permits unrestricted non-commercial use, distribution, and reproduction in any medium, provided the original work is properly cited.
준이 될 뿐만 아니라 예후 판단과 식립될 임플란트 매식 체 종류 판단에 중요한 지침이 되기 때문에 치료계획의 수립 단계에서 무치악 치조제 상태에 관한 정확한 진단 이 중요하다. 콘빔 전산화단층촬영(cone-beam com- puted tomography, CBCT)은 기존의 전통적인 방식의 CT와 비교하여 낮은 흡수 선량으로 높은 질의 진단 영상 을 제공해주고12, 무치악 치조제와 인접 해부학적 구조물 에 대한 삼차원 정보를 왜곡 없이 제공해주기 때문에 임 플란트 시술 전 평가에 유용한 도구로 최근 널리 사용되 고 있다13,14.
단면 영상에서 임플란트 식립을 위한 치조제의 고경과 폭경을 측정한 연구들이 다수 존재하지만 방법론적인 측 면에서 한계를 지니고 있다. 단면 영상 내에서 치조제의 폭경은 측정하는 높이에 따라 달라지는데, 측정을 위한 명확한 기준점은 없는 실정이다. 임의로 설정한 기준점 을 이용한 연구15-17에서는 치조제의 전체적인 형태를 파 악하는 데 한계를 보이고 있다. 무치악 치조제 중 일정한 폭경이 넘는 부위만이 임플란트에 적절한 골 지지를 제 공해 줄 수 있는 유효한 부분이기 때문에 일정한 기준 폭 경을 넘는 부위만을 고경으로 측정한 연구들18-21이 있다.
이들의 연구에서는 임플란트 매식체의 선택이나, 술자의 외과적 숙련도에 따라서 달라질 수 있는 기준 폭경을 임 의적으로 정하였다는 한계가 있다.
이 연구의 목적은 상악 구치부 무치악 부위의 저작능 회복을 위한 임플란트 식립 시에 잔존 치조제의 상태를 평가하기 위한 CBCT 영상 이미지를 분석하고, 실제 사 용된 수술법과 연관성을 알아보는 것이다.
Summers11에 의해 치조정 접근법 술식인 골이식제를 동반한 오스테오톰법(bone added osteotome sinus floor elevation)이 확립된 후 20년의 시간이 경과하였다. 그 동 안 임플란트 표면처리 기술의 발전과 술자들의 외과적 숙련도 및 임상 경험이 증가하였다. 임상적으로 덜 침습 적이고, 치료기간을 줄이는 방법을 환자가 선호하기 때
I
서론임플란트 식립 시 무치악 치조제의 상태는 성공 적인 골 지지 여부를 결정하는 데 중요한 역할 을 하는데, 상악 구치 무치악 부위 치조제는 양적으로나 질적으로 모두 충분하지 못한 경우가 많다.
일반적으로 치아 발거 후 치관 및 협측 방향에서 급격한 골 소실이 발생한다1. 특히 상악 구치부는 발치 후 가속 화되는 상악동 함기화(pneumatization)2 때문에 근단 방 향에서도 골이 부족하게 된다. 무치악 치조제의 부피에 관한 연구3에 따르면, 상악 구치부의 65% 경우에서 치조 제의 부피가 부족하여 임플란트 식립이 부적합하였다.
질적인 측면에서도 Lekholm-Zarb의 분류 방법4을 이용 했을 때 상악 구치부의 골은 대부분 III형과 IV형으로 분 류되어서 다른 부위에 비해 골질이 상대적으로 불량하다 는 평가를 받고 있다5.
상악 구치부 임플란트 식립 시 많은 경우 잔존 골 지지 를 보강하기 위해 상악동 거상술(sinus floor elevation)과 같은 추가적인 외과적 술식이 요구된다6. 상악동 거상술 은 높은 성공률과 예지성이 우수한 시술로 받아들여져7,8 널리 이용되고 있다. 상악동 거상술은 골 이식을 위한 접 근 방식에 따라 측방 접근법(lateral window approach)9 과 치조정 접근법(crestal approach)10,11으로 나눌 수 있 다. 또한 거상술이 시행된 부위 임플란트 식립 시기에 따 라 상악동 거상술과 임플란트 식립을 동시에 시행하는 동시식립 방법과 거상술 시행 수개월 후 임플란트를 식 립하는 지연식립 방법으로 나눌 수 있다10. Zitzmann과 Schärer6는 상악 구치부 무치악 치조골의 고경에 따라 1, 2단계 측방 상악동 절개법과 치조정 접근법을 제안하였 다.
무치악 치조제의 상태는 골증대술 방법을 결정하는 기
문에 치조정 접근법과 동시식립을 선호하게 되는데 이러 한 경향이 어느 정도 반영되었는지 판단하는 것은 의미 가 있다고 생각된다.
II
연구재료 및 방법1. 연구대상
2012년 10월부터 2013년 8월 사이에 상악 임플란트 식 립을 주소로 서울대학교 치과병원에 내원한 환자 중 CBCT 영상을 촬영한 환자들을 대상으로 후향적인 연구 를 시행하였다. 환자의 수는 남자 67명, 여자 50명, 총 117명이었고, 환자의 평균나이는 51.7±11.3세(남자:
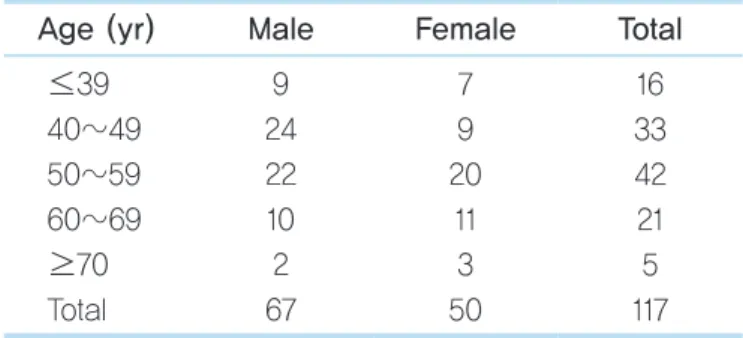
50.4±10.4세, 여자: 53.1±12.3세)였다. 환자들의 연령 별 및 성별 분포는 Table 1과 같다.
치아가 상실된 무치악 부위는 총 259개로 환자당 평균 2.21개의 무치악 부위를 가지고 있었다. 부위별로 살펴 보면 제1소구치(1st premolar, P1), 제2소구치(2nd pre- molar, P2), 제1대구치(1st molar, M1), 제2대구치(2nd molar, M2) 부위가 각각 24, 47, 99, 89개였으며, 소구치 부위의 합(P1+P2)은 71개, 대구치 부위의 합(M1+M2)은 188개로 대구치 부위가 약 2.6배 많았다(Table 2).
이 연구는 CBCT 방사선 영상을 분석하고, 실제 시행된 수술법을 의무기록지로 확인하였으며, 서울대학교 치과병 원 연구윤리심의위원회의 승인을 받았다(No. CRI13020).
2. 방사선 촬영 방법
CBCT 촬영은 치과용 CT 엑스선 장치인 DINNOVA3 (Willmed Co., Seoul, Korea)를 이용하였다. 관전압 100 kVp, 관전류 8~10 mAs로 설정하였으며, 화소의 크기 (voxel size)는 0.3 mm였다. 촬영 범위는 교합 평면에서 상악동을 모두 포함하도록 설정하였고, 교합평면이 지면 에 수직이 되도록 환자를 위치시킨 후 촬영하였다. 촬영 후 의료용 디지털 영상 및 통신(digital imaging and communications in medicine)22 데이터를 OnDemand3DTM (Cybermed Inc., Irvine, CA, USA)를 이용하여 축상 영상 (axial view), 단면 영상(cross sectional view), 파노라마 영상(panoramic view)으로 재구성하였다. 단면 영상 구성 시 단면 사이의 간격은 2 mm였다.
3. 무치악 치조제 측정 방법
무치악 치조제의 관찰 및 측정을 위해 picture archiving and communications system (PACS) 소프트웨어로 PiViewSTAR (Infinitt Co., Seoul, Korea)를 이용하였다.
무치악 치조제의 고경과 폭경 정보를 측정하기 위해서는
Table 1. Distribution of the patients' sex and age Age (yr) Male Female Total
≤39 40~49 50~59 60~69
≥70 Total
9 24 22 10 2 67
7 9 20
11 3 50
16 33 42 21 5 117
Hayoung Kim et al. : Height and Width of Edentulous Maxillary Posterior Alveolar Ridge. Implantology 2013
Table 2. Location of missing teeth
Grouping P1 P2 M1 M2
Location Premolar &
molar Total
24 (9.3) 47 (18.1) 99 (38.2) 89 (34.4) 71 (27.4) 188 (72.6)
259 (100) Values are presented as number (%).
P1: 1st premolar, P2: 2nd premolar, M1: 1st molar, M2:
2nd molar.
Hayoung Kim et al. : Height and Width of Edentulous Maxillary Posterior Alveolar Ridge. Implantology 2013
단면 영상을 이용하였다. 먼저 임플란트 수복 예정 부위 중심을 관심 단면(section of interest, SOI)으로 선택하 였다. SOI는 구강악안면방사선과 전문의에 의해 작성된 판독문에 기술된 것을 선택하였다.
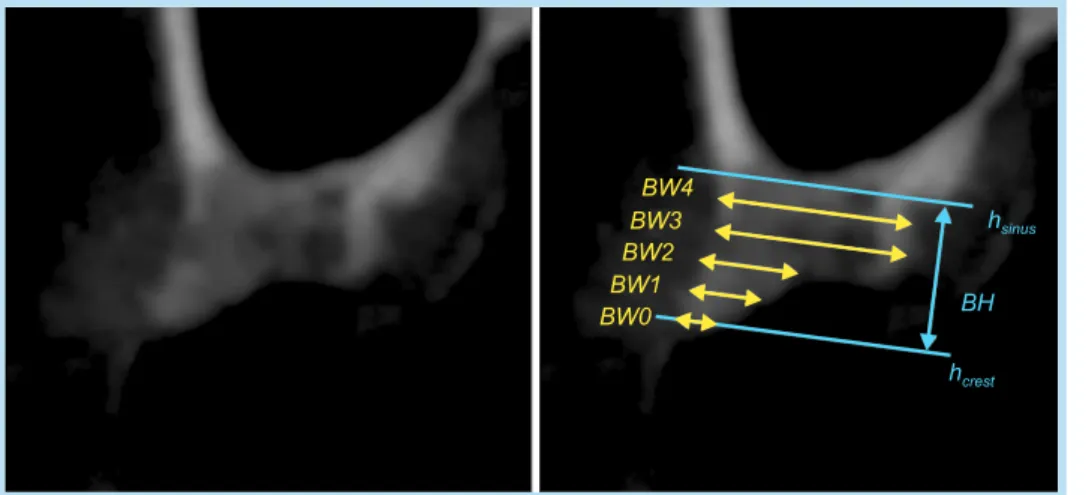
각 SOI상에서 무치악 치조제의 장축 방향 고경과 협설 방향 폭경을 측정하였다(Fig. 1). 치조제의 장축 방향을 기준으로 삼고 이것에 수직 방향으로 치조정 높이(hcrest) 와 상악동저 높이(hsinus)를 설정하였다(소구치의 경우 일 부에서 치조제 상방으로 상악동저가 아닌 비강저가 관찰 되고, 이때는 비강저의 높이를 상악동저 높이로 설정하 였다). 치조정과 상악동저 사이의 거리를 무치악 치조제 고경(bone height, BH)으로 측정하였다. 치조정 높이에 서 시작하여 치조골 장축을 따라 상방으로 1 mm 간격으 로 이동하면서 각 높이에서의 치조제 폭경(bone width, BW)을 측정하였다. 각 높이에서 폭경이 측정 가능하므 로 이들 사이의 구분을 위해 BWx로 표시하고, 이 때 x는 치조정으로부터 mm 단위 거리를 의미하는 것으로 하였 다. 즉, BWx는 치조정 x mm 상방에서 무치악 치조제의 폭경이라 할 수 있다.
치조제의 고경이 10 mm 이하인 경우에는 BW0부터 상 악동저 높이에 이르기 전까지 BWx를 측정하였다. 예를 들어, 고경이 4.7 mm인 경우 BW0, BW1, BW2, BW3, BW4, 총 5개의 폭경을 측정하였다. 치조제의 고경이 10
mm를 초과하는 경우, 임상적으로 치조정 10 mm 상방에 서 치조제의 폭경은 임플란트 식립을 위해 충분하기 때 문에 BW0에서 BW10까지만 측정하였다.
거리의 측정은 PACS 내 디지털 캘리퍼를 이용하였다.
수직 보조선과 11개의 수평 보조선을 치조제 영상과 중첩 시켜서 측정에 사용하였다. 인접한 수평보조선 사이 간 격이 치조제 영상 축척의 1 mm에 대응되도록 확대율을 조정하고, 치조제의 장축을 수직 보조선과 평행하도록 일치시켰다. 수직 보조선을 따라 고경을 측정하고, 수평 보조선을 따라 각 높이에서의 폭경을 측정하였다.
4. 치조제 상태와 수술 방법 간의 연관성
환자의 의무기록 분석을 통해 실제 임플란트 수술이 실행된 경우, 상악동 거상술 여부와 그 방법에 대해 조사 하고, 측정된 치조제의 고경과 실제 상악동 거상 방법 사 이의 연관성을 분석하였다. 실제 임플란트 수술이 확인 가능한 부위는 52개였다. 고경과 상악동 거상 방법 사이 의 연관성 분석 시 한 상악동에 대해서 무치악 부위가 다 수 존재하고, 측방 접근이 시행되었을 경우 모든 위치에 대해서 연관성을 기록하지 않고, 가장 고경이 낮은 부위 만 측방 접근과 함께 기록하여, 연관성을 편향시킬 수 있 는 데이터의 경우는 배제하였다. 예를 들어 P2 부위 무치 악 치조골의 고경은 치조정 접근이 가능한 수준인데, 인
Fig. 1. A measuring method of the height and width of the alveolar ridges. hsinus: the height of sinus floor, hcrest: the height of alveolar crest, BH:
the distance between hsinus and hcrest, BWx: the width at x mm from hcrest.
Hayoung Kim et al. : Height and Width of Edentulous Maxillary Posterior Alveolar Ridge. Implantology 2013
접한 M1 부위 고경이 측방 접근이 필요한 수준일 경우, 측방 접근으로 두 부위를 거상하게 되는데, P2의 고경과 측방 접근과의 연관성 데이터는 수술법 판단에 직접적인 영향을 미치지 않았기 때문에 제외하였다.
5. 통계 분석
통계 분석은 IBM SPSS statistics version 21.0 (IBM Co., Armonk, IL, USA)을 이용하였다. 무치악 위치별, 성별, 연령별 고경과 폭경의 분포를 분석해 보면 표본의 수가 충분하지 않고, 정규분포를 만족하지 않기 때문에 비모수 검정(nonparametric test)을 사용하여 분포의 차 이를 분석하였다. 위치별, 연령별 분포 비교는 Kruskal- Wallis H-검정을 이용하여 유의미성을 검증하였고, 차 이가 있다고 결론이 날 경우, 각 군 사이의 비교를 위해 사후 검정(post hoc comparison)으로 Mann-Whitney U-검정을 시행하였다. 성별 분포 비교는 Mann- Whitney U-검정을 이용하였다. 모든 분석에서 유의수 준은 0.05로 설정하였다(p<0.05).
III
연구결과1. 고경의 측정
치아 상실 위치별 무치악 치조제 고경(BH)의 측정 결 과는 Table 3과 같다. 고경의 평균치는 P1, P2, M1, M2 위치에서 각각 12.58, 9.63, 5.79, 5.92 mm였다. 무치악 치조제 고경이 큰 일부의 측정치가 전체 평균을 높이는 경향이 있기 때문에, 중간값은 평균값보다 작은 경향을 보여주었다.
측정된 고경을 치아상실 위치별로 같은 통계군으로 설 정하여 Kruskal-Wallis H-검정을 실시한 결과 분포의 유의미한 차이를 보여주었다(p<0.05). 사후 분석으로 모
든 조합에 대해 Mann-Whitney U-검정을 시행한 결과 P1, P2와 M1, M2는 서로 다른 두 군 사이에서는 유의미 한 차이를 보여주었지만(p<0.05), 같은 군 내 조합인 P1 과 P2, M1와 M2 사이에서는 통계적으로 유의미한 차이 를 보여주지 않았다.
상악 구치부 무치악 치조제의 고경을 Zitzmann과 Schärer6가 제시한 상악동 거상술 수술법 선정 기준에 근 거해 분포를 정리해 보면 Table 4와 같다. 상악동 거상술 과 같은 골증대술이 필요한 증례(BH≤10 mm)는 P1, P2,
Table 3. The mean and median of the residual ridge height (BH) by tooth position (mm)
Location n Mean±SD Median Quartile P1a
P2a M1b M2b
24 47 99 89
12.58±5.59 9.63±5.52 5.79±4.28 5.92±3.90
12.38 8.36 4.75 5.36
8.69~17.12 5.31~13.49 2.75~7.18 3.38~7.47 Kruskal-Wallis H-test: statistically significant difference between groups (p<0.05).
Mann-Whitney U-test: statistically significant difference between different characters (a or b) (p<0.05).
SD: standard deviation, P1: 1st premolar, P2: 2nd premolar, M1: 1st molar, M2: 2nd molar.
Hayoung Kim et al. : Height and Width of Edentulous Maxillary Posterior Alveolar Ridge. Implantology 2013
Table 4. Distribution of the residual ridge height (BH) by tooth position (%)
BH (mm) P1 P2 M1 M2
<4 4~6 6~10
>10
0.0 12.5 25.0 62.5
8.5 21.3 36.2 34.0
39.6 26.0 15.6 18.8
33.7 25.8 29.2 11.2 P1: 1st premolar, P2: 2nd premolar, M1: 1st molar, M2:
2nd molar.
Hayoung Kim et al. : Height and Width of Edentulous Maxillary Posterior Alveolar Ridge. Implantology 2013
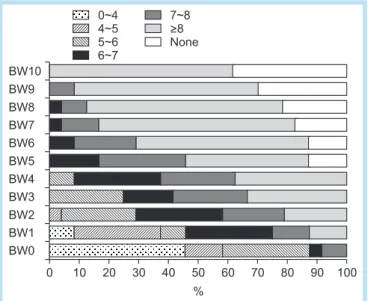
M1, M2 부위에서 각각 37.5%, 69.9%, 81.2%, 88.8%였 다. 좀 더 세밀한 기준으로 고경의 분포를 분류한 결과는 Fig. 2와 같다.
성별 고경 분포를 비교하기 위해 M1 위치에서 고경의 분포를 분석하였다(Table 5). 고경의 평균은 남성에서 6.20 mm, 여성에서 5.24 mm로 남성에서 약간 높게 나타 났지만, 차이의 유의성을 판단하기 위해 남성, 여성 두
군에 대해 Mann-Whitney U-검정을 시행한 결과, 고경 의 분포가 성별의 범주에서 유의미한 차이를 보이지 않 았다(p>0.05).
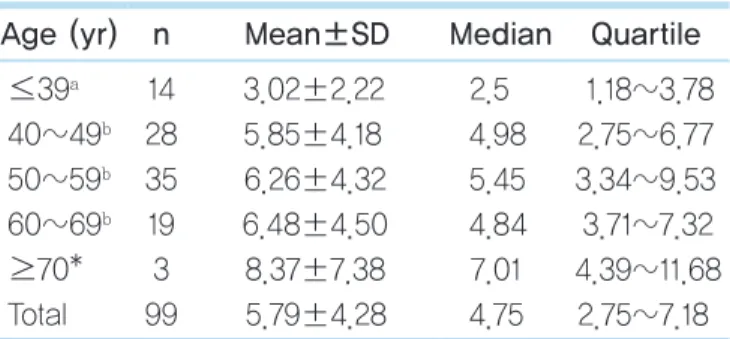
다음으로 연령별 고경 분포를 비교하기 위해 M1 위치 의 고경을 분석하였다(Table 6). 70대 이상의 경우 표본 수가 적어(n=3) 통계적 유의성 분석에서 제외시켰다.
Kruskal-Wallis H-검정 결과 고경 분포가 연령의 범주 에서 유의미한 차이가 있었고(p<0.05), Mann-Whitney U-검정 결과 30대 이하 연령대의 고경이 다른 연령대의 고경보다 작았고, 그 차이가 유의미했다(p<0.05).
2. 폭경의 측정
폭경은 높이에 따라 달라지므로, 치조정 3 mm 상방을 기준으로 측정된 폭경(BW3)을 이용하여 상실 위치별로 분포를 비교하였다(Table 7). P1, P2, M1, M2에서 치조정 3 mm 상방 폭경의 평균값은 각각 7.48, 8.13, 10.19, 11.50 mm였다. Kruskal-Wallis H-검정 결과 폭경의 분 Table 6. The residual ridge height (BH) at 1st molar by age (mm)
Age (yr) n Mean±SD Median Quartile
≤39a 40~49b 50~59b 60~69b
≥70*
Total
14 28 35 19 3 99
3.02±2.22 5.85±4.18 6.26±4.32 6.48±4.50 8.37±7.38 5.79±4.28
2.5 4.98 5.45 4.84 7.01 4.75
1.18~3.78 2.75~6.77 3.34~9.53 3.71~7.32 4.39~11.68
2.75~7.18 SD: standard deviation.
Kruskal-Wallis H-test: distribution of the residual ridge height showed the statistically significant difference among age groups (p<0.05).
Mann-Whitney U-test: the statistically significant difference between different characters (a or b) (p<0.05).
*Exclusion from statistics due to the sample size.
Hayoung Kim et al. : Height and Width of Edentulous Maxillary Posterior Alveolar Ridge. Implantology 2013
Table 5. The residual ridge height (BH) at 1st molar position (mm)
Gender n Mean±SD Median Quartile Male
Female Total
57 42 99
6.20±4.65 5.24±3.70 5.79±4.28
4.76 4.42 4.75
3.10~7.74 1.99~6.41 2.75~7.18 SD: standard deviation.
Mann-Whitney U-test: distribution of BH did not show the statistically significant difference between male and female group (p>0.05).
Hayoung Kim et al. : Height and Width of Edentulous Maxillary Posterior Alveolar Ridge. Implantology 2013
Fig. 2. Distribution of the residual ridge height (BH) by tooth position. P1: 1st premolar, P2: 2nd premolar, M1: 1st molar, M2: 2nd molar.
Hayoung Kim et al. : Height and Width of Edentulous Maxillary Posterior Alveolar Ridge. Implantology 2013
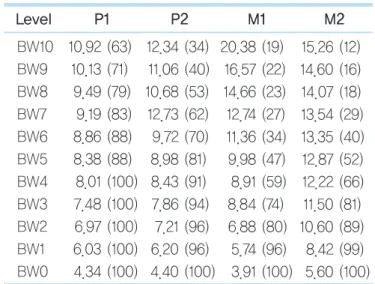
포가 상실 위치의 범주에서 유의미한 차이를 보였으며 (p<0.05), Mann-Whitney U-검정 결과 P1+P2, M1, M2 는 서로 유의미한 폭경의 분포 차이를 보여주었다 (p<0.05). 측정된 모든 높이에서 상실 위치별 폭경의 평 균은 Table 8에 기술되어 있다.
치아 상실 위치별 무치악 치조제 폭경 분포는 Table 9 과 같다. Regular platform (RP) 식립을 위해 필요한 치 조제 최소 폭경인 6 mm와 wide platform (WP) 식립을 위해 필요한 치조제 최소 폭경인 7 mm를 기준으로 삼 고, 폭경의 분포를 분류하였다. 고경이 폭경 측정 높이보 다 작을 경우 폭경의 측정이 불가한 경우가 있고 이것 또 한 별도로 분류하였다. 치조정 상방 3 mm 높이에서 폭 경(BW3)을 기준으로 P1, P2 위치에서는 25%, 19%의 경 우에서 폭경이 6 mm를 넘지 못하였지만, M1, M2 위치 에서는 2%, 1%의 경우만이 폭경이 6 mm를 넘지 못하였 다. 좀 더 세밀한 기준으로 폭경의 분포를 분류한 결과는 Figs. 3~6과 같다.
3. 치조제 고경과 수술 방법 간의 연관성
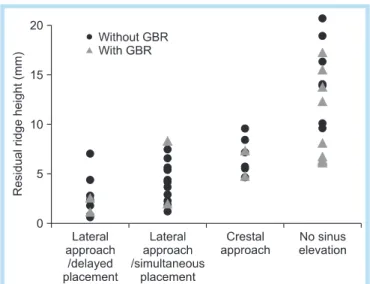
실제 수술방법과 관찰된 고경 사이의 연관성 분석결과 는 Fig. 7과 같다. 측방 접근으로 상악동을 거상하고 임 플란트를 지연해서 식립한 환자 군에서 골이 충분함에도 지연식립을 한 경우는 시술 중 상악동저 천공으로 임플 란트 식립을 중단하고 골 이식만 시행한 경우였다. 골이 충분하지 않음에도 불구하고 상악동 거상술을 하지 않고 골유도재생술(guided bone regeneration)을 시행한 경우 는 상악동이 병적인 상태였거나, 인접치 치조정과의 높 이 차이 관계 때문이었다. 부족한 부피로 인해 실제로 골 증대술을 시행한 대구치 부위는 전체의 83.3%였다. 도입 부에 제시된 기준에 의하면 지연식립이 필요한 고경이 4 mm 이하인 무치악 부위 중 46.7%에서 실제 수술 시 동 시식립이 이루어졌다.
Table 7. BW3 by tooth position (mm)
Location n (%)* Mean±SD Median Quartile P1a
P2a M1b M2c
24 (100) 47 (94) 99 (74) 89 (81)
7.48±1.63 8.13±2.19 10.19±2.45 11.50±2.42
7.31 8.13 9.77 11.43
6.18~8.49 6.98~9.82 8.86~11.60 9.96~12.84 Kruskal-Wallis H-test: distribution of the width showed significant difference among different groups (p<0.05).
Mann-Whitney U-test: statistically significant difference among different characters (a, b, or c) (p<0.05).
BW3: bone width 3, SD: standard deviation, P1: 1st premolar, P2: 2nd premolar, M1: 1st molar, M2: 2nd molar.
*This percentage means the proportions that BW3 can be measured (if the height is less than 3 mm, BW3 cannot be measured).
Hayoung Kim et al. : Height and Width of Edentulous Maxillary Posterior Alveolar Ridge. Implantology 2013
Table 8. The mean ridge width by tooth position BW0~BW10 (mm)
Level P1 P2 M1 M2
BW10 BW9 BW8 BW7 BW6 BW5 BW4 BW3 BW2 BW1 BW0
10.92 (63) 10.13 (71)
9.49 (79) 9.19 (83) 8.86 (88) 8.38 (88) 8.01 (100) 7.48 (100) 6.97 (100) 6.03 (100) 4.34 (100)
12.34 (34) 11.06 (40) 10.68 (53) 12.73 (62) 9.72 (70) 8.98 (81) 8.43 (91) 7.86 (94)
7.21 (96) 6.20 (96) 4.40 (100)
20.38 (19) 16.57 (22) 14.66 (23) 12.74 (27) 11.36 (34) 9.98 (47) 8.91 (59) 8.84 (74) 6.88 (80)
5.74 (96) 3.91 (100)
15.26 (12) 14.60 (16) 14.07 (18) 13.54 (29) 13.35 (40) 12.87 (52) 12.22 (66) 11.50 (81) 10.60 (89)
8.42 (99) 5.60 (100) Values are presented as number (%).
This percentage means the proportion that the ridge width can be measured at each height (if the height is less than x mm, BWx cannot be measured).
BW: bone width, P1: 1st premolar, P2: 2nd premolar, M1: 1st molar, M2: 2nd molar.
Hayoung Kim et al. : Height and Width of Edentulous Maxillary Posterior Alveolar Ridge. Implantology 2013
Table 9. Distribution of ridge width (BW0~BW10) by tooth position
Level P1 P2 M1 M2
NA 0~4 4~6 6~7 ≥7 NA 0~4 4~`6 6~7 ≥7 NA 0~4 4~6 6~7 ≥7 NA 0~4 4~6 6~7 ≥7 BW10
BW9 BW8 BW7 BW6 BW5 BW4 BW3 BW2 BW1 BW0
38 29 21 17 13 13 0 0 0 0 0
0 0 0 0 0 0 0 0 0 8 46
0 0 0 0 0 0 8 25 29 38 42
0 0 4 4 8 17 29 17 29 29 4
63 71 75 79 79 71 63 58 42 25 8
66 60 47 38 30 19
9 6 4 4 0
0 0 0 0 0 0 2 4 9 17 49
0 2 2 2 2 2 9 15 17 23 23
0 0 0 2 6 13 12 4 15 11 15
34 38 51 57 62 66 70 70 55 45 13
81 78 77 73 65 53 41 26 20 4 0
0 0 0 0 0 0 0 0 1 4 43
0 0 0 0 0 0 0 2 3 23 33
0 0 0 0 0 0 0 6 9 23 14
19 22 23 27 34 47 59 66 67 47 10
88 84 82 71 60 48 34 19 11 1 0
0 0 0 0 0 0 0 0 0 3 16
0 0 0 0 0 1 0 1 1 8 47
0 0 0 0 0 0 3 2 4 11 13
12 16 18 29 40 51 64 78 83 76 24 Values are presented as %.
This percentage means the proportion that the ridge width can be a part of each range at each position and height.
BW: bone width, P1: 1st premolar, P2: 2nd premolar, M1: 1st molar, M2: 2nd molar, NA: cannot be measured.
Hayoung Kim et al. : Height and Width of Edentulous Maxillary Posterior Alveolar Ridge. Implantology 2013
Fig. 3. Distribution of the ridge width at 1st premolar position. BW: bone width.
Hayoung Kim et al. : Height and Width of Edentulous Maxillary Posterior Alveolar Ridge. Implantology 2013
Fig. 4. Distribution of the ridge width at 2nd premolar position. BW: bone width.
Hayoung Kim et al. : Height and Width of Edentulous Maxillary Posterior Alveolar Ridge. Implantology 2013
IV
총괄 및 고찰이 연구에서는 임플란트 식립 예정 부위의 여러 단면 영상(cross sectional view) 중 중앙에 해당하는 단면 영 상을 기준으로 무치악 치조제의 폭경과 고경을 측정하여 골의 부피가 어느 정도인지 평가하였다. 이 방법은 SOI 의 인접부위에도 비슷한 수준의 골이 존재한다는 가정을 전제로 하고 있다. SOI와 그 인접 부위에 불균일한 골연 이나 국소적인 골결손 또는 골의 외형에 심한 경사가 존 재할 경우, 골의 부피를 과대평가하거나 과소평가할 가 능성이 있다. 발치 후 상당한 시간 경과 후에는 이러한 불균일성이 어느 정도 해소되는 경향을 보이겠지만, 발 치 후 단기간 내에 임플란트를 식립하는 경우에는 이러 한 골연의 불균일성을 고려해야 한다.
향후 연구에서는 이러한 한계를 극복하기 위해 중심 부위 이외의 인접 부위도 SOI로 설정하여 무치악 치조골 의 부피를 평가할 필요가 있다. 이러한 방법을 통해 골의 Fig. 5. Distribution of the ridge width at 1st molar position.
BW: bone width.
Hayoung Kim et al. : Height and Width of Edentulous Maxillary Posterior Alveolar Ridge. Implantology 2013
Fig. 6. Distribution of the ridge width at 2nd molar position. BW: bone width.
Hayoung Kim et al. : Height and Width of Edentulous Maxillary Posterior Alveolar Ridge. Implantology 2013
Fig. 7. Association between the residual ridge height and the surgery techniques. GBR: guided bone regeneration.
Hayoung Kim et al. : Height and Width of Edentulous Maxillary Posterior Alveolar Ridge. Implantology 2013
부피가 충분한지 삼차원적으로 정확하게 평가할 수 있 고, 나아가 무치악 치조제상에 존재하는 골 결손이나 불 균일한 골연의 정도와 빈도를 정량적으로 파악할 수 있 을 것으로 생각된다.
무치악 위치별 분포에서 M1, M2의 상실이 소구치 부위 상실보다 2.6배 이상 많았다. 이것은 대구치에서 치근이 개부의 존재23 때문에 환자와 술자에 의한 접근이 어려워 상대적으로 치주질환의 진행 양상이 심하다는 사실이 반 영된 결과로 보인다. 대구치 발치 시에는 치근이개부 부 위의 병변을 고려하여, 염증성 육아조직이 존재한다면 소파술로 제거하여 발치 후 합병증을 줄이고 골의 빠른 치유를 도모해야 한다24.
고경과 폭경의 측정치는 기준 축에 의해 측정값이 달라 진다. 시상면(sagittal plane)에 평행하도록 기준 축을 설 정하고 고경과 폭경을 측정하게 되면16,17,21, 객관적인 기 준으로 측정이 가능하다. 하지만 상악 구치부 임플란트 는 협측 경사를 이룬 상태로 식립되기 때문에 실제 이용 되는 치조골의 고경, 폭경과 시상면을 기준으로 측정된 고경, 폭경 사이에는 불일치가 존재한다. 외과적 가이드 (surgical stent)를 제작하여 보철적으로 계획된 위치와 방향에서 치조골의 고경과 폭경을 측정하게 되면20 가장 정확한 결과를 알 수 있겠지만, 후향적인 연구의 특성상 모든 증례에서 외과적 가이드를 기대할 수 없었다. 이 연 구에서는 치조골의 장축을 임플란트 식립 방향으로 가정 하고, 이것을 기준으로 고경과 폭경을 측정하였다.
상악 무치악 구치부의 고경 측정 결과에 따르면 P1, P2, M1, M2 위치에서는 37.5%, 64.0%, 81.2%, 88.8%의 증례에서 임플란트 식립을 위한 치조제의 고경이 충분하 지 못하기(BH≤10 mm) 때문에, 상악동 거상술과 같은 골증대술을 고려해야 한다. 특히, 대구치 부위는 측방 접 근을 고려해야 할 만큼 심한 골 부족 상태(BH≤6 mm)인 증례가 M1, M2 위치에서 각각 65.6%, 59.5% 정도로 많 은 비율을 차지하고 있었다. 상악동 거상술이 높은 성공
률과 예지성이 우수한 시술로 인정되고 있어 널리 사용 되지만, 상악동의 병적인 상태인 증례나, 인접 치아 치조 정과의 관계를 고려해야 하는 증례에서는 상악동 거상술 이 아닌 골증대술이 이용되는 경우도 다수 존재하였다.
상악 무치악 구치부 고경의 연령별 분포(Table 5)에서 는 여성이 남성에 비해 잔존 치조제 고경이 더 작았지만, 통계적으로 차이가 유의미하지 않았다. 기존 문헌에서도 하악의 경우 무치악 치조제 고경의 성별차이가 통계적으 로 유의미하게 확인되는 반면, 상악의 경우 그 차이가 유 의미하지 않게 관찰되었다25.
상악 무치악 구치부 고경의 연령별 분포(Table 6)에서 다른 연령에 비해 30대 이하 연령의 치조골 고경이 다른 연령의 고경에 비해 유의미하게 작은 분포를 보여주었 다. 30대 이하 연령에서 임플란트 식립하는 경우에는 급 진성 치주염이나 선천성 결손 등의 치조골의 심한 손실 을 야기하는 문제를 가지고 있기 때문에 이렇게 유의미 한 차이를 보이는 것으로 추정된다.
임플란트 협측으로 필요한 치조골의 두께에 관한 종설26 에 따르면, 임플란트의 협측 피질골의 적절한 두께는 연 조직 지지를 가능하게 하고, 협측골의 흡수나 치은의 퇴 축을 막을 수 있다. 정확한 수치를 결론 내리기에 과학적 인 근거가 아직 불충분하지만26, 임플란트 제조사들은 임 플란트 매식체의 협설측으로 각각 1 mm 정도 두께의 치 조골을 확보할 것을 권장하고 있다27. 일반적으로 RP의 경우에는 6 mm, WP의 경우에는 7 mm의 폭경을 권장하 고 있다. 치조정 상방 3 mm 높이에서의 폭경(BW3) 측정 결과에 따르면 소구치 부위인 P1, P2에서 폭경이 6 mm 에 미치지 못하는 경우가 전체의 25%, 19%였다. 이렇게 수평적으로 골이 부족할 경우에는 임플란트 식립 시 드 릴 위치나 각도에 유의할 필요가 있다. 골증대술 없이 임 플란트를 식립하였을 때 위치나 각도가 조금만 어긋나도 열개나 천공이 발생하기 쉽게 되며, 열개나 천공 없이 식 립하였다고 하더라도, 협설 방향으로 1 mm의 골을 충분
히 확보하지 못할 가능성이 높다. 이와는 달리 대구치의 경우에서는 폭경이 문제되는 경우는 거의 없고, 대부분 고경 때문에 골증대술이 필요하게 된다.
이 연구에서는 측정된 고경과 실제 수술 방법 사이의 연관성을 확인하였다(Fig. 7). 1998년 Zitzmann과 Schärer6는 상악 구치부 무치악 부위 치조골 고경에 따라 세 가지 조합의 수술 방법을 제안하였다. 당시에 제안된 기준에 따르면 고경이 4 mm 이하일 경우에는 상악동 거 상술을 먼저 시행하고, 일정 기간이 지난 후 임플란트 식 립을 진행하는 지연식립을 시행해야 한다. 하지만 현재 실제로 시행되는 수술 방법을 조사한 결과 고경이 4 mm 이하인 증례 중 46.7%의 경우에서 임플란트 식립을 상악 동 거상술과 동시에 시행하는 동시식립이 이루어졌다.
이는 최근 임플란트 표면 기술의 발전과 술자들의 외과 적 숙련도가 증가하면서 작은 고경에서 동시식립 시에도 높은 성공률을 얻을 수 있다는 술자의 임상적 경험과 치 료 기간이 짧고, 외과적 수술 횟수를 줄이는 것을 선호하 는 환자의 요구가 반영된 것으로 판단된다. 따라서, 제시 된 수술법의 선택 기준을 최근의 기술과 경향이 반영되 도록 수정할 필요가 있다고 판단된다.
V
결론본 연구를 통해 상악 대구치부 임플란트 식립 시에는 84.8% 경우에 부족한 골 부피를 극복하기 위한 골증대술 이 필요함을 확인할 수 있었고, 이를 위해 임플란트 치료 계획 시에 CBCT 등을 통한 사전의 철저한 분석이 필요하 다고 판단된다. 또한, 최근 상악동 거상술 수술 시 기존 에 제시된 기준에 의하면 임플란트 지연식립이 필요한 작은 치조제 고경 상태에서도 동시식립이 적극적으로 시 행되고 있음을 알 수 있었다.
참고문헌
1. Pietrokovski J, Massler M. Alveolar ridge resorption following tooth extraction. J Prosthet Dent. 1967; 17: 21-27.
2. Sharan A, Madjar D. Maxillary sinus pneumatization following extractions: a radiographic study. Int J Oral Maxillofac Implants. 2008;
23: 48-56.
3. Eufinger H, König S, Eufinger A. The role of alveolar ridge width in dental implantology. Clin Oral Investig. 1997; 1: 169-177.
4. Lekholm U, Zarb GA. Patient selection and preparation. In: Brånemark PI, Zarb GA, Albrektsson T, eds. Tissue-integrated prostheses:
osseointegration in clinical dentistry. Chicago: Quintessence; 1985. p.
199-210.
5. Truhlar RS, Orenstein IH, Morris HF, et al. Distribution of bone quality in patients receiving endosseous dental implants. J Oral Maxillofac Surg. 1997; 55(12 Suppl 5): 38-45.
6. Zitzmann NU, Schärer P. Sinus elevation procedures in the resorbed posterior maxilla. Comparison of the crestal and lateral approaches. Oral Surg Oral Med Oral Pathol Oral Radiol Endod. 1998; 85: 8-17.
7. Pjetursson BE, Tan WC, Zwahlen M, et al. A systematic review of the success of sinus floor elevation and survival of implants inserted in combination with sinus floor elevation. J Clin Periodontol. 2008; 35(8 Suppl): 216-240.
8. Tan WC, Lang NP, Zwahlen M, et al. A systematic review of the success of sinus floor elevation and survival of implants inserted in combination with sinus floor elevation. Part II: transalveolar technique. J Clin Periodontol. 2008; 35(8 Suppl): 241-254.
9. Boyne PJ, James RA. Grafting of the maxillary sinus floor with autogenous marrow and bone. J Oral Surg. 1980; 38: 613-616.
10. Tatum H Jr. Maxillary and sinus implant reconstructions. Dent Clin North Am. 1986; 30: 207-229.
11. Summers RB. A new concept in maxillary implant surgery: the osteotome technique. Compendium. 1994; 15: 152, 154-6, 158 passim.
12. Ziegler CM, Woertche R, Brief J, et al. Clinical indications for digital volume tomography in oral and maxillofacial surgery. Dentomaxillofac Radiol. 2002; 31: 126-130.
13. Hatcher DC, Dial C, Mayorga C. Cone beam CT for pre-surgical assessment of implant sites. J Calif Dent Assoc. 2003; 31: 825-833.
14. BouSerhal C, Jacobs R, Quirynen M, et al. Imaging technique selection
for the preoperative planning of oral implants: a review of the literature.
Clin Implant Dent Relat Res. 2002; 4: 156-172.
15. Simon BI, Von Hagen S, Deasy MJ, et al. Changes in alveolar bone height and width following ridge augmentation using bone graft and membranes. J Periodontol. 2000; 71: 1774-1791.
16. Pramstraller M, Farina R, Franceschetti G, et al. Ridge dimensions of the edentulous posterior maxilla: a retrospective analysis of a cohort of 127 patients using computerized tomography data. Clin Oral Implants Res.
2011; 22: 54-61.
17. Farina R, Pramstraller M, Franceschetti G, et al. Alveolar ridge dimensions in maxillary posterior sextants: a retrospective comparative study of dentate and edentulous sites using computerized tomography data. Clin Oral Implants Res. 2011; 22: 1138-1144.
18. Razavi R, Zena RB, Khan Z, et al. Anatomic site evaluation of edentulous maxillae for dental implant placement. J Prosthodont. 1995;
4: 90-94.
19. Bolin A, Eliasson S, von Beetzen M, et al. Radiographic evaluation of mandibular posterior implant sites: correlation between panoramic and tomographic determinations. Clin Oral Implants Res. 1996; 7: 354-359.
20. Cho BH. Bone height measurements of implant sites: comparison of panoramic radiography and spiral computed tomography. Korean J Oral
Maxillofac Radiol. 2002; 32: 61-66.
21. Lee JH, Han WJ, Choi YH, et al. Measurement of maxillary sinus volume and available alveolar bone height using computed tomography.
Korean J Oral Maxillofac Radiol. 2003; 33: 35-41.
22. National Electrical Manufacturers Association, American College of Radiology. Digital imaging and communications in medicine (DICOM).
Washington, DC: National Electrical Manufacturers Association; 1998.
23. Bower RC. Furcation morphology relative to periodontal treatment.
Furcation root surface anatomy. J Periodontol. 1979; 50: 366-374.
24. Korean Association of Oral & Maxillofacial Surgeons. Textbook of oral
& maxillofacial surgery. 2nd ed. Seoul: Dental & Medical Publishing Co.; 2005.
25. Soikkonen K, Ainamo A, Xie Q. Height of the residual ridge and radiographic appearance of bony structure in the jaws of clinically edentulous elderly people. J Oral Rehabil. 1996; 23: 470-475.
26. Teughels W, Merheb J, Quirynen M. Critical horizontal dimensions of interproximal and buccal bone around implants for optimal aesthetic outcomes: a systematic review. Clin Oral Implants Res. 2009; 20(Suppl 4): 134-145.
27. Buser D, von Arx T, ten Bruggenkate C, et al. Basic surgical principles with ITI implants. Clin Oral Implants Res. 2000; 11(Suppl 1): 59-68.