관리 및 운영자 메뉴얼
소개
본 지침서는 K-Ecohub 를 관리하는 관리자(시스템관리자와 운영스태프를
포함)그룹이 어떻게 K-Ecohub 시스템(이하, 본시스템) 을 관리하는지
방법을 설명합니다.
a. 대상그룹
1) Administrator
본 시스템의 전반적인 관리(Module, User 등)를 담당하는 최고 관리자 입니다.2) Data manager
목차
소개 ... 1
a. 대상그룹 ... 1 b. 구독 가이드라인 ... 1목차 ... 2
시스템설정 및 관리 ... 4
c. 시스템 구성환경 ... 4 a. 서비스 데몬 시작, 중지, 재시작 ... 5 b. 시스템 주의사항 ... 5 c. 트러블 슈팅 ... 6ADMINISTRATOR ... 6
1. User & Access Management ... 6
i. Monitoring User ... 6
ii. Access Control ... 6
iii. Export User List ... 6
2. Theme Management ... 6
3. Menu Management ... 11
iv. Primary Menu ... 11
vi. User Menu ... 11
vii. Add New Menu ... 11
4. Module Management ... 11
5. Search Management ... 14
viii. Maintain Search API for Apache Solr ... 14
ix. Manage Search Interface and Result ... 14
6. Tags and Vocabulary Management ... 14
c. 트러블 슈팅
Administrator
본 시스템의 전반적인 관리(Module, User 등)를 담당하는 최고
관리자 입니다.
1.
User & Access Management
본 시스템의 전반적인 관리(Module, User 등)를 담당하는 최고
관리자 입니다.
i. Monitoring User
ii. Access Control
iii. Export User List
2.
Theme Management
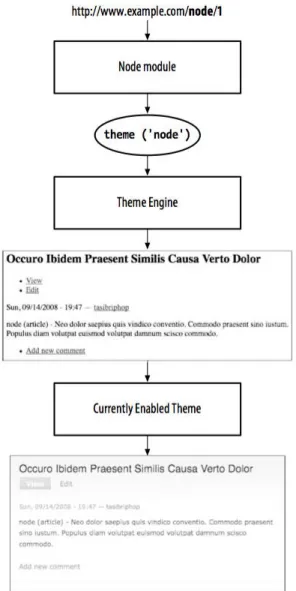
The Theme SystemAs discussed briefly in Chapter 1, modules generate the contents of a given page, and the theme system provides the opportunity to cut in and customize the page before it’s displayed. A theme is a collection of images, CSS, and (usually) HTML/PHP files that change the look of Drupal’s default output. With a simple flick of a radio button, you can completely change the design of your website by choosing a different theme, and you can customize settings on a theme to make adjustments, such as to the site logo or colors, as we saw in Chapter 2.
The theme system consists primarily of a theme engine, which defines the dynamic parts of the page, as well as the rules for how Drupal’s output is defined and can be over- ridden, and the currently enabled theme, such as Garland. The theme engine is capable of setting up the basic structure and markup of the content and rendering the entire page template with the current page’s content inside of it. But where the visual magic happens—and where you start to gain control over exactly how each element on the page looks—is in the theme itself. Every single element on the page, from the title in the browser window, to the site logo, to the regions where blocks are placed, to the links in the menu bar, is run through the theme system. The difference between an obviously “Drupal”-looking site and a stylish site is creative use of the tools provided by the theme layer. Let’s look at the pieces of a theme we have to work with, as well as how Drupal expects us to use them.
.info Files
Beginning with Drupal 6, themes are defined by a theme_name.info file that resides in the theme’s directory, often simply referred to as the “.info file.” This file defines a variety of metadata for the theme, including the name of the theme, a description, its Drupal core version compatibility, and which theme engine it uses. Beyond those ba- sics, the .info file can also define the block regions available to the theme, and the CSS stylesheets and JavaScript files used. You can also define the theme features available to administrators under the theme configuration screens (see Chapter 2.
Here is a simple example showing basic theme information, taken from the core Blue- marine theme. A full description of all attributes available in .info files for themes is available at http://drupal.org/node/171205.
Regions
Regions are the areas on your site where you can place blocks, as we did in Chapter 2 and in other places throughout this book. Drupal provides five regions by default:
• Header (header) • Footer (footer) • Left sidebar (left) • Right sidebar (right) • Content (content)
You can change this list of regions for your theme in its .info file. Here is an example that creates a new region, Ads, and also excludes some of the defaults, such as Header, by not defining them:
regions[ads] = Ads regions[right] = Right sidebar regions[content] = Content regions[footer] = Footer
By defining just these regions in the theme, site administrators are limited in where they may place blocks on the block administration page for this theme. There will be no Header or Left sidebar for them to use. This can be very powerful when you have a very specific layout and you don’t want administrators putting things in the “wrong” place.
Features refer to the various elements of a theme that can be toggled on and off through the theme
administration interface at Administer→Site building→Themes (admin/ build/themes), under the Configure tab. The following is the default list of features provided by Drupal core:
• Logo (logo) • Site name (name) • Site slogan (slogan)
• Mission statement (mission)
• User pictures in posts (node_user_picture)
• User pictures in comments (comment_user_picture) • Search box (search)
• Shortcut icon (favicon) • Primary links (primary_links) • Secondary links (secondary_links)
If you wish to exclude a feature from the toggle list, you need to create your own feature list in the .info file and make sure to comment out or remove the items you don’t want. The Skyliner theme has the following feature list:
features[] = name features[] = slogan features[] = mission features[] = search features[] = favicon
CSS
stylesheets[all][] = styles/reset.css stylesheets[all][] = styles/typography.css stylesheets[all][] = styles/forms.css stylesheets[all][] = styles/style.css
JavaScript
There is also an automatically recognized default JavaScript filename, script.js, that you can use for your themes. Again, you can add additional filenames to your .info file as well, as you can see in another example from the Skyliner theme:
scripts[] = skyliner.js
Template Files
Creating a Drupal theme with just images and CSS will work fine if Drupal’s outputting the HTML markup that you need. But what happens when you want to place an extra <div> around the title of a node, or you want to move the user picture from the top of posts to the bottom? This is where template files come in, providing the bulk of Drupal’s output markup.
Comments, nodes, blocks, and the overall page itself are all output through template files. Template files end with the special filename extension of .tpl.php. A template file is named by the item that it is controlling; for example, comments are controlled by the comment.tpl.php file, and the entire page is controlled by the page.tpl.php file.
The template.php File
We’ve now had a look at the basic building blocks for themes and some of the files that make up a theme. The last, crucial piece of Drupal theming is the ability to completely override the output that Drupal gives you by default and use your own custom markup instead. This is where the fun really starts.
You may find that while the template files give you a lot of control, you can’t really do much about the HTML that you are given inside those variables. You can do all the HTML editing around them that you want, but how do you crack into the variables themselves and get them to behave? The real customization of the nitty-gritty details comes in the form of the template.php file. This file is where master themers can really show their stuff by adding extra variables and logic to their themes.
3.
Menu Management
iv. Primary Menu
v. Secondary Menu
vi. User Menu
vii. Add New Menu
4.
Module Management
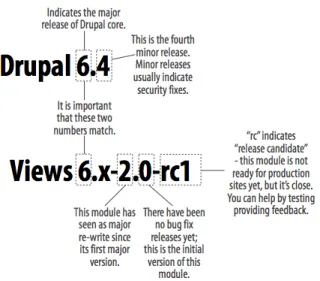
Version numbersWhen discussing updates, it helps to have some background information about Dru- pal’s version numbering system. For all the gory details, see http://drupal.org/handbook/ version-info, summarized in Figure A-9. Each “major” release of Drupal core gets a new number: Drupal 5, Drupal 6, Drupal 7, and so on. A new major Drupal version is released every 12–18 months, and consists of new features, improved usability, and more flexible APIs. Throughout a major ver- sion of Drupal’s release cycle, several “minor” versions of Drupal are also released, such as 6.0, 6.1, and 6.2. Minor Drupal versions fix critical security problems and important bugs as well.
Releases of projects like contributed modules, themes, and translations have a version naming scheme such as 6.x-1.3. The “6.x” indicates the major version of Drupal that it is intended to work with; in this case, Drupal 6. The “1” indicates the “major” release of the contributed module. And the “3” indicates that this is the third bug fix release of this major release of the module.
Some releases also have “extra” version information, such as “-beta4” or “-rc2.” These indicate that the modules are still in development, but available for testing.
Figure A-9. Drupal version numbers explained Module List
Update Status Module
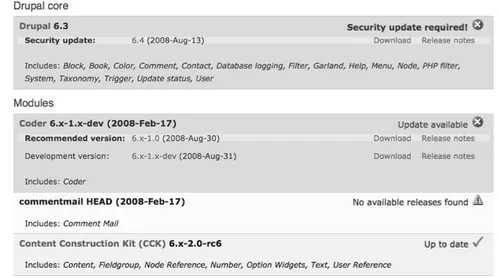
Drupal 6 core includes a module called Update Status, which periodically checks Dru- pal.org for new releases of modules, themes, and Drupal itself. If one or more of these projects are out of date, or if there is a new security release available, a red warning will be displayed on all pages of the administration panel, telling you to head to Adminis- ter→Reports→Available updates (admin/reports/updates) for more information. You can also sign up for the security mailing list at http://drupal.org/security and/or follow the Security RSS feed
(http://drupal.org/security/rss.xml).
Figure A-10. Update status showing the different project statuses
The color codes indicate the following status states: Red
A new recommended version of this project is available, and the version on this website is out of date. Pay special attention to projects marked “Security update required!” and download the new recommended versions immediately.
Yellow
Update status was not able to find the state of this project. This will happen on projects such as a specific site’s custom, hand-built theme, or on projects that were not downloaded from Drupal.org, or if there was a problem reading the status information for this project.
Green
Project is up-to-date. No further action is required. Site Maintenance Mode
If you navigate to the Administer→Site configuration→Site maintenance (admin/set- tings/site-maintenance) page, pictured in Figure A-11, you can set the site into “off- line” mode prior to the upgrade taking place. This mode is useful, as sometimes updates can temporarily cause errors before the entire process is completed. Offline mode makes the site inaccessible to regular users while still allowing administrators to work on the site. You don’t want users creating content while you are updating the database, because this could lead to losing some data or errors displayed to your site visitors.
Update.php Script
The update.php script, pictured in Figure A-12, automatically runs through any underlying database changes that a module requires in order to move from one version to another. Whether you’re updating between minor or major versions of Drupal and contributed modules, update.php is the piece that ensures your data ends up in the places that it should when all is said and done.
The script lists all of the enabled modules on your site, and specifies whether updates are required to be run. A progress bar counts up as each module is updated. And finally, at the end, a report is generated with the database changes that were performed, along with any errors that occurred.
5.
Search Management
viii. Maintain Search API for Apache Solr
ix. Manage Search Interface and Result
6.
Tags and Vocabulary Management
Data Manager
Data(데이터), Site(장소), Measurement(조사방법), Species(종),
Taxonomy(분류) 등 시스템 전반적인 콘텐츠를 관리합니다. 특히
Data Contributor 가 제출하는 Data 에 대해 반려,
Review 요청(Reviewer), 최종 승인을 담당합니다.
a. 데이터 워크플로우별 관리 방법
1. Pre Submission.
문서가 제출되기 이전 임시보관 상태를 뜻합니다. Draft 로 상태전이가
가능하며 상태전이 권한은 Data Contributor 에게 있습니다.
2. Draft.
문서가 최초 제출된 상태, 문서의 내용이 변경되어 다시 검토가 필요한
상태를 의미합니다. Need Review 또는 Need Contributor Work 로의
상태전이가 가능하며 상태전이 권한은 Data Manager 에게 있습니다.
3. Need Review.
분야별 전문가의 세부 검토 상태를 의미합니다. Ready to Publish 또는
Need Data Manager Work 로의 상태전이가 가능하며 상태전이 권한은
Reviewer 에게 있습니다.
4. Need Contributor Work.
데이터에 오류 등이 있어 최초 문서 작성자(Data Contributor)의 수정이
필요한 상태를 의미합니다. Draft 로 상태전이가 가능하며 상태전이
권한은 Data Contributor 에게 있습니다.
5. Need Data Manager Work.
데이터에 오류 등이 있어 Data Manager 의 수정이 필요한 상태를
의미합니다. Need Contributor Work 로 상태전이가 가능하며 상태전이
6. Ready for Publication.
데이터에 대해 최종 Confirm 을 요구하는 상태를 의미합니다. Published
또는 Need Contributor Work 로 상태전이가 가능하며 상태전이 권한은
Data Manager 에게 있습니다.
7. Published.
데이터가 Publish 된 상태를 의미합니다. Draft 로 상태전이가 가능하며
상태전이 권한은 해당 데이터를 생성한 Data Contributor 에게 있습니다.
b. Site 관리
데이터셋에 대한 지리정보를 사이트에 등록 및 관리(수정 및 삭제)
합니다. Site 의 등록 및 관리 권한은 Administrator 와 Data
Manager 에게 있습니다.
2. ‘Site’버튼 클릭.
4. Site(장소) 등록을 위해 각 필드에 알맞은 정보를 입력하고 ‘Save’버튼
클릭.
주의: 필수입력 필드(*)는 반드시 입력해야 Site(장소)를 생성할 수
있습니다.